Installing WordPress - The Complete Guide
![]()
Installing WordPress is the fastest and easiest. In most cases, you can fully install WordPress in 5-10 minutes. Of course, provided that you already have a ready-made domain and hosting or your own server. Now, many hosts provide affordable tools for installing WordPress. Popular hosting control panels do not deviate from this innovation either; when installing such a hosting panel on a server, you can immediately install WordPress.
We live in the age of technology and many imagine how easy it is to install an engine on a server. However, knowledge is power. In this guide, I will try to provide as much information as possible on this subject. We will move from an easy installation to a more complex one. Let's get acquainted with pre-installation of the server for WP, the rights to folders and files, installation problems and their solution, and at the end a small reminder for you for the future.
We will cover all options for installing WordPress on a remote server, local server, clean server without a hosting panel. Let's get started, there will be a lot of information, so tea or coffee with a liver)))
The content of the article:
- Preparing to Install WordPress
- Installation in 5 minutes
- Installing WordPress in detail
- Installing WordPress on Dedian
- File and folder permissions (chmod) WordpRess
- Problems Installing WordPress
- Where are the folders and files of a WordPress site
- Conclusion
Preparing to Install WordPress
In order for the installation to go without a hitch, it is extremely important to do the following:
1. Have a remote or local server fully operational and with open access to the Internet. The server must have full access to files and folders. In most cases they use shell or FTP access, access is issued by your hosting provider. If the provider provides you with a hosting control panel, then in this case you will have free access to files / folders.
This point also applies to those who have their own server with a hosting panel installed on it, for example: VestaCp or HestiaCp. In this case, you have direct access to the contents of your site. I recommend even in this case to access the server remotely. HestiaCp has a tool for remotely uploading files to a server and modifying them.
2. Make sure the server is technically suitable for installing WordPress. At the moment, almost 100% hosting providers are suitable for installing WordPress. If you have your own server, then pay attention to WordPress system requirements:
- PHP version 7.4 or higher (8.0 and higher recommended).
- MySQL version 5.7 or MariaDB version 10.3 or higher (MariaDB version 10.3 is recommended).
- From 1 gigabyte of space on the server (with a margin, but more is better).
- 64 MB of RAM on the server (the best option would be from 128 MB to 1024 GB).
- Nginx or Apache, you can also use the bundle.
- HTTPS protocol.
If you have any difficulties, then you can get detailed information from your hosting provider.
3. To edit and modify files, you will need a good text editor such as Notepad++. A text editor, one way or another, you will need in the future.
4. FTP client is a program for uploading files to a server. As I wrote above, the best and most popular is filezilla. The program will come in handy if you do not have direct access to files and folders on the server.
5. Of course, you need WordPress itself, the latest version can be downloaded from the official website https://ru.wordpress.org/latest-ru_RU.zip.
Installation in 5 minutes
Installation without creation wp-config.php file and other files, in this case all operations are carried out by WordPress itself. Please note that with such an installation, it is extremely important that you have full access to files and folders on the server (with full rights).
If suddenly, installation in this way fails, you can use another installation method described below. It has a file file wp-config.php you need to manually create and configure it.
Do the following in order:
1. Download the WordPress archive
Download the WordPress ZIP archive, then extract it to a convenient location (the default is the WordPress folder - it contains all the installation files). Next, you need to copy all the contents inside this folder to the root directory of your server. The site folder can be called: www, html or public_html (maybe the name of your domain). The following content is copied:
(folder) wp-admin, (folder) wp-content, (folder) wp-includes, index.php, license.txt, readme.html, wp-activate.php, wp-blog-header.php, wp-comments -post.php, wp-config-sample.php, wp-cron.php, wp-links-opml.php, wp-load.php, wp-login.php, wp-mail.php, wp-settings.php , wp-signup.php, wp-trackback.php, xmlrpc.php.
See image below:

2. Create a database on the server
The database is created in the hosting server control panel. If you have your own server and do not have a hosting panel installed, then you can create a database and a user for it through the console. When you create a database, you bind a MySQL user to it - he must have all possible rights (superuser): modify, create databases, create tables in them and make any changes.
3. Open a browser and go to your site to start installing WordPress
Paste the link into your browser http://example.com, Where example.com is your site, you should see the following window:
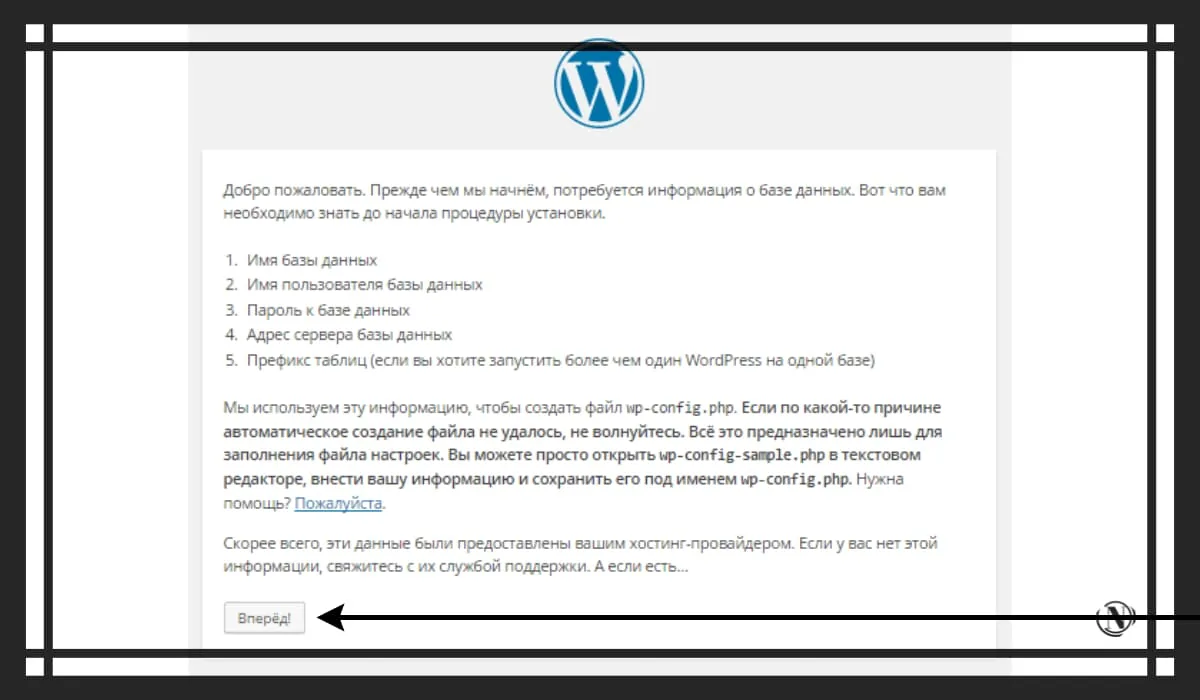
Click on the "Next" button to go to the installation preliminary data window:

Here you need to fill in all the fields to connect WordPress to your MySQL database:
- Database name (here write the name of your database that you created in advance);
- Username (here you specify the user of your database under which access to it is created);
- Password (here you specify the password created in advance for the database to access it);
- Database server (by default "localhost", no need to change it in 99%, do not change it);
- Table prefix (preferably use complex database table prefix, examples: almo_ vitra_ golara_ ivritta_ somni_ etc.).
Next, click on the "Submit" button, if everything was done correctly and the correct data was entered, you will see the following:

This message will mean that the configuration file wp-config.php is correctly created in the root of the site. This is great news as the WordPress connection has established a connection to the MySQL database. Press "Run installation» to start installing the site:

Here you need to fill in the data about your site and you:
- Site name (if there is a site name, then enter it, or write the name of your domain as an option);
- Username (the name under which the site will be logged in, the administrator name for managing the WordPress admin panel);
- Password (create a complex password to enter the admin panel);
- Your e-mail (be sure to indicate a valid mail, I recommend that you initially take care and create mail specifically for your site).
Once you have filled everything in, click on "Install WordPress» it will create the necessary tables in the database and the user - the site administrator. After that you will see the following: See image below

My sincere congratulations, your site is installed. Click on "Login" to be taken to the WordPress admin login page. It is necessary to enter your data (username and password) that you entered earlier.
Installation of WordPress CMS in detail
In case you are having difficulty with the first way to install WordPress. Or if you are interested in a detailed installation method, then follow the instructions below:
- Download WordPress (ZIP archive), then unzip it to your computer or directly to the server;
- Create a MySQL database on the server, WordPress will be associated with it (this is an extremely important point for a correct installation). When you create a database, you bind a MySQL user to it - he must have all possible rights (superuser): modify, create databases, create tables in them and make any changes;
- Open the unzipped folder wordpress and rename the file
wp-config-sample.phpVwp-config.phpis the main WordPress configuration file; - Open
wp-config.phpin a text editor and specify in it the connection settings for the database you just created: See example:define('DB_NAME', 'name'); // Where 'name' is the name of the database define ('DB_USER', 'username'); // Where 'username' is the MySQL username define ('DB_PASSWORD', 'password'); // Where 'password' is the database access password - Move WordPress Files to Server: you need to place the files in the root directory - this directory is located on the server where the site http://example.com/ "looks". Copy the entire contents of the unpacked wordpress folder (where the wp-config.php file is located) to the root folder of the server (usually the www, html or public_html folder);
- Go to your link in a browser: you need to follow the link: http://example.com and you will be transferred to http://example.com/wp-admin/install.php;
- If done right, you will see the WordPress installation dialog (see the manual above for the installation process). You need to go through the steps described in the first guide and in a few minutes the site will be ready to go.
Now let's look at each stage in detail.
Step 1: Download and Extract WordPress Files
Download the WordPress ZIP archive to your computer, then extract it to a convenient location (the default is the WordPress folder - it contains all the installation files).
Then you need to copy all the contents inside this folder to the root directory of your server. The site folder can be called: www, html or public_html (maybe the name of your domain). The following content is copied:
(folder) wp-admin, (folder) wp-content, (folder) wp-includes, index.php, license.txt, readme.html, wp-activate.php, wp-blog-header.php, wp-comments -post.php, wp-config-sample.php, wp-cron.php, wp-links-opml.php, wp-load.php, wp-login.php, wp-mail.php, wp-settings.php , wp-signup.php, wp-trackback.php, xmlrpc.php.
Uploading WordPress directly to the server
If you have shell access to a web server and experience with console applications, you can upload a WordPress installation directly to a web server bypassing your computer using the following command:
wget: wget https://ru.wordpress.org/latest-ru_RU.zip
Then unzip the distribution using the command:
tar -xzvf latest-ru_RU.zip
The WordPress archive will be unpacked into the wordpress folder and will be located in the same folder as the latest-ru_RU.zip archive. If you don't have shell access, or console experience, you can upload WordPress directly to a web server using the ZipDeploy program.
If you have your own server and hosting panel installed, for example VestaCp or HestiaCp. Then everything is a little easier, follow these steps using HestiaCp as an example:
- Go to the HestiaCp control panel;
- On the main page, in the top menu, the second tab "Files" (click on it, a window with your server files will open);
- Follow the path home / web / your_domain/ public_html
- Then, in the public_html folder, click on Add files and upload the WordPress archive files to the root directory.
Stage 2. database creation
Not everything is as simple as it seems at first glance. All hosting panels and providers have slightly different ways of creating. However, the principle of creation is the same. In some cases, the already created MySQL database is provided by the host.
- Go to your hosting panel (check with your hosting provider for details). If you have your own hosting panel, then just log into it.
- Look in the menu for the "Databases" or "MySQL" section. In the hosting panels VestaCp and HestiaCp, the section is signed as "DB" - database.
- In this section, you need to create a MySQL database. Usually you fill in: database name, username and password. Be careful in the VestaCp and HestiaCp panels when you are creating a database. By default, the hosting panel administrator prefix is added as follows: _admin or _your name in the panel.
- Next, it is very important to save all data: database name, username and password. You will need these data during the installation process to fill in the wp-config.php configuration file.
Here are some examples you can rely on:
Creating a Database in the Pleks Panel:

Creating a database in ISPmanager:

Creating a database in cpanel:

Creating a database in HestiaCp:

As you can see, the process of creating a database is almost the same everywhere. But, if you still do not quite understand how to do it. In this case, I recommend contacting your hosting provider with a request to do this for you.
Creating a Database Using the MySQL Console
If you have shell access to the web server and you know how to work in the command line, and your MySQL user has full rights to create other MySQL users and databases (superuser rights), then use the instructions below to create a user and database data for WordPress. This method is also suitable for those who have direct access to the web server, but do not have the server control panel installed.
$ mysql -u adminusername -p Enter password: Welcome to the MySQL monitor. Commands end with ; or\g. Your MySQL connection id is 5340 to server version: 3.23.54 Type 'help;' or '\h' for help. Type '\c' to clear the buffer. mysql> CREATE DATABASE databasename; Query OK, 1 row affected (0.00 sec) mysql> GRANT ALL PRIVILEGES ON databasename.* TO "wordpressusername"@"hostname" -> IDENTIFIED BY "password"; Query OK, 0 rows affected (0.00 sec) mysql> FLUSH PRIVILEGES; Query OK, 0 rows affected (0.01 sec) mysql> EXIT Bye $
You need to register your data in the following variables:
- adminusername in most cases this is root, unless you have another account with higher user privileges, of course.
- databasename here you need to specify the name of the database examples: wordbase or franbase.
- wordpressusername you can use wordpress by analogy or come up with something else.
- hostname leave the default localhost.
- password password - I recommend using a complex and long password that has upper and lower case characters, as well as numbers.
Step 3.Setting up the wp-config.php file
There is no wp-config.php file in the WordPress archive, but there is an analogue file: wp-config-sample.php. The configuration file is created based on wp-config.php, you need to rename the wp-config-sample.php file by removing the '-sample' suffix from its file name. After that, open it in a text editor for subsequent edits.

We need to edit the following lines:
define('DB_NAME', 'dbnamehereMySQL'); // Name of the database we created earlier define('DB_USER', 'username_MySQL_name'); // Username from your MySQL database define('DB_PASSWORD', 'yourpasswordMySQL'); // password from it define('DB_HOST', 'localhost'); // this parameter does not need to be changed define('DB_CHARSET', 'utf8'); // do not change define('DB_COLLATE', ''); // do not change
Explanation of values:
- DB_NAME is the name of the previously created database.
- DB_USER is the username of your MySQL database.
- DB_PASSWORD - here is the password of the user you chose when creating the database.
- DB_HOST - here they always set localhost by default.
- DB_CHARSET is the database encoding, not a changeable value. Change (break).
- DB_COLLATE - this is the type of character comparison in the encoding specified in DB_CHARSET, we also do not change.
Authentication Keys
Required to change if not already installed. Authentication keys are used in various parts of the WordPress code. This is a pre-installed tamper protection, changing these parameters is mandatory, below is an example:
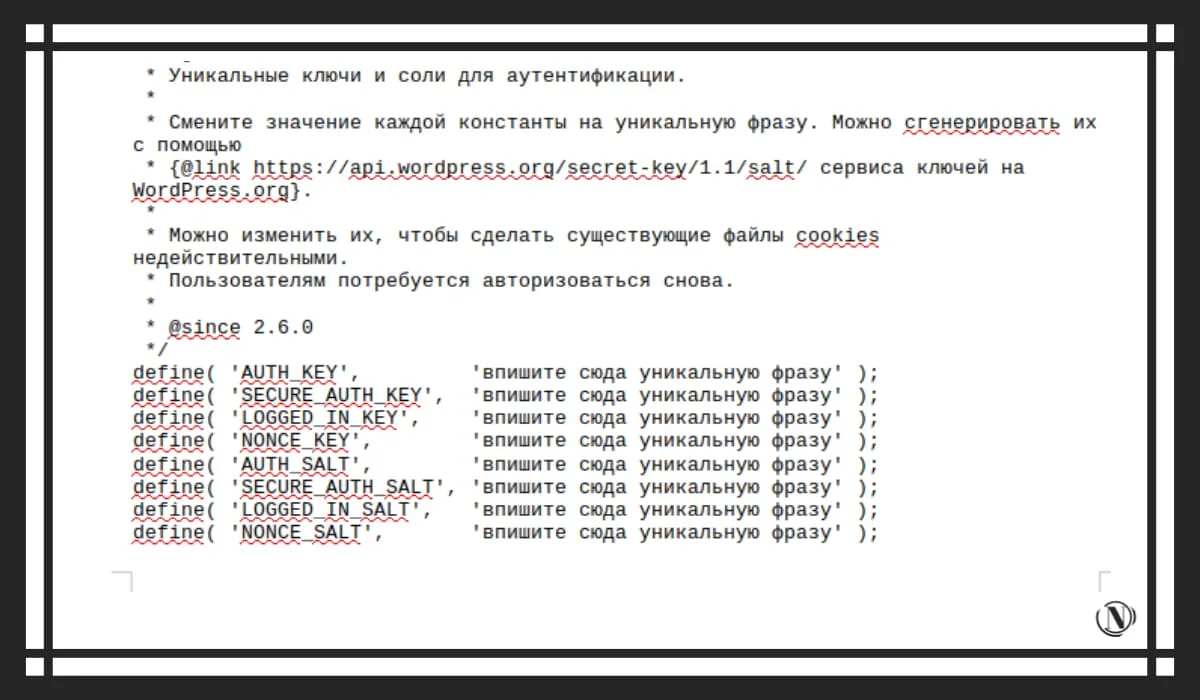
define('AUTH_KEY', 'ofofkpfwifjwfowjfhwfiMKIJODokofkjmaaJIsdJ'); define('SECURE_AUTH_KEY', 'WIjdijOOJNNS265do58sdhusokoOJIOJDMJ'); define('LOGGED_IN_KEY', 'kkowomJJinuhUHojp29s8d9oss48wdwosfd'); define('NONCE_KEY', 'opfpfwpijoKPOJFIGJEPFJOKOkodfpwk25ff'); define('AUTH_SALT', 'jiNIJIJijnnUHbyGVYtfctCBJo755GGVY67U'); define('SECURE_AUTH_SALT', 'MKJihBUVVfyc87yy2nKB6ybB090Mnbhyinl'); define('LOGGED_IN_SALT', 'JNOuyftfyrdtcvIUHOILNBHVF4cfctt7ugbinih'); define('NONCE_SALT', 'pdjfoOHUHuhUHOUHjnopopo99R49NDJ9');
MySql database table prefix
Specified in the variable $table_prefix - the prefix will set the initial name of each created section in the table. Let's say you have users in a table, they can be saved as users. If you have the default prefix wp_, then the name of the section will be wp_users. If we change it to slou_, we get: slou_users.

I recommend changing the prefix to something more complex, this will secure access to your database tables. Such a measure of protecting the site at the initial stage will save you a lot of time in the future.
$table_prefix = 'wp_'; - change this value to your own for example: tilma_
Stage 4. placing files in the root directory of the site on the server
We need to place all our files in the root directory - this directory is located on the server, usually the link of the site http://example.com/ leads there. Copy all your wordpress files and folders (where the wp-config.php file is located) to this server's root folder (usually the www, html or public_html folder).
May have the following paths:
- home / web / your_site / public_html;
- /web/yoursite/public_html;
- / www / web / your_site / public_html;
- /www/yoursite/public_html;
- / web / your_site / www;
- / your_site / www;
I gave some options for where this directory can be located on the server. But the location is about the same everywhere. It is recommended to place in the main directory, no need to create additional folders. Otherwise, you will have to edit wp-config.php. And this is such a pleasure, you will get confused in the ways, WP will not be installed.
Step 5: Run the WordPress Installation
We have already created the database, copied all the files and folders to the root directory, renamed wp-config-sample.php to wp-config.php and edited it. Only then can you start installing WordPress. The installation process will create all the necessary tables in the database, as well as the user (site admin).
To start the installation, you need to go to the site (go to the URL of your site):
- The WordPress installation files are located in the root directory of the server, so the link will be: http://your_domain/. You should be redirected to http://example.com/wp-admin/install.php.
- During the installation process, you will enter the name of your site, email, name (the name of the administrator of the admin panel) and password. You can also “ask search engines not to index the site”, just check the box next to such an item. By checking this box, you indicate to search bots that the site is closed. This item can be changed already in the WordPress admin panel.
NoteA: After installation, you will be able to change most of the information in the admin panel. But you won't be able to change the username.
Congratulations, your WordPress installation is complete.
Step by step installation of WordPress on Dedian
After we have covered the easiest and most popular ways to install WordPress. You can move on to a more complex one, this is installation on a server running the Debian operating system. In this case, you should already have the server software installed. Its installation is carried out during the installation of the Debian distribution.
To successfully install WordPress, please follow these requirements:
- Operating system Debian version 9.4 and higher.
- Superuser root or a user with access to the sudo command.
- Installed LAMP stack.
- PHP version 7.4 (preferably 8.0 and higher).
- MySQL version 5.7 or MariaDB version 10.3.
- From 1 gigabyte of space on the server (with a margin, but more is better).
- 128 megabytes of RAM on the server (better more).
- Nginx or Apache, you can also use the bundle.
- HTTPS protocol.
In case you don't have a LAMP stack installed, I'll briefly describe the installation process.
Installing the LAMP stack on Debian
The LAMP stack includes the Debian Linux operating system, the Apache web server, the MySQL database management system, and a server-side scripting language for processing PHP dynamic content. All this is necessary to support dynamic sites and web applications.
Installation Requirements:
- Debian 9.4 and up.
- Superuser root or a user with access to the sudo command.
Installing and configuring the Apache web server
To install and initially configure the Apache web server:
- Open a terminal window.
- Update the lists of installation packages of the distribution to the latest versions with the command:
sudo apt-get update
Install the latest version of the Apache web server and its modules with the command:
sudo apt install apache2 apache2-utils
Agree with the installation of the Apache web server by answering (Yes).
Open the apache2.conf configuration file for editing with the command:
sudo nano /etc/apache2/apache2.conf
In apache2.conf file:
- At the very end, add the line ServerName , Where enter the external IP address of your web server.
- Save your changes using the keyboard shortcut CTRL+O.
- Finish editing using the keyboard shortcut CTRL+X.
To check the configuration and current state of the Apache web server, run the command:
sudo apache2ctl configtest
If there are no errors, you will see:
Syntax OK
To apply the changes, restart the Apache web server with the command:
sudo systemctl restart apache2
To check if the web server is working, open a browser and enter the web server's IP address in the address bar. If the installation and configuration of the Apache web server is successful, the default page of the web server should appear: see image below

Installing MySQL
To install and configure MySQL:
- Open a terminal window.
- Install the MySQL server with the command:
sudo apt-get install mysql-server
Agree with the installation of the MySQL server by answering (yes).
- To make changes to the MySQL server configuration, use the command:
sudo mysql_secure_installation
This command will run the MySQL server security script. Enter security settings:
- Set a password for the root account - use a complex password.
note
The root user in this case refers exclusively to the MySQL DBMS and is not a Debian OS account. If necessary, remove the anonymous accounts that are created during MySQL installation:
- Answer (Yes) to remove anonymous accounts.
- Answer (No) if deleting anonymous accounts is not required.
Account data is only needed for the database test, so it can be deleted.
- If necessary, disable remote access to MySQL for the root account:
- Answer (Yes) to disable the remote access feature.
- Answer (No) to allow remote access.
- If necessary, remove the test base (Test):
- Answer (Yes) to remove the base Test.
- Answer (No) if you don't want to remove the Test base.
This MySQL database is created by default and is needed for testing purposes. Removing it does not affect the operation of the system. In response to a request to make changes to MySQL and reload table access privileges:
-
- Answer (Yes) to make changes and reboot.
- Answer (No) if changes and reboot are not required.
Installing PHP and Additional Packages
To install PHP and its packages that may be required to run and set up WordPress:
- Open a terminal window as root or sudo.
- To install PHP along with additional packages, use the command:
sudo apt-get install php libapache2-mod-php php-cli php-mcrypt php-intl php-mysql php-curl php-gd php-soap php-xml php-zip php-readline php-opcache php-json
Answer (Yes) to complete the installation.
- Check that the Apache web server correctly rendered PHP scripts. For this:
- Create an info.php file with the command:
sudo nano /var/www/html/info.php
- In the info.php file put the following text:
- Save your changes using the keyboard shortcut CTRL+O.
- Finish editing using the keyboard shortcut CTRL+X.
- In the address bar of the browser, add the line to the web server address:
/info.php
As a result, a similar page should be displayed: see image below

If everything went well, I recommend deleting the file info.php, command:
sudo rm /var/www/html/info.php
This is necessary to enhance security and restrict access to the server.
After installing and initially configuring the LAMP stack, you can proceed to install WP.
Preparing to install WP
Follow these steps before installing WordPress:
Open a terminal window as root or another user with sudo rights.
Change to your home directory with the command:
cd ~
Next, create a temporary directory tempWRC:
mkdir tempWP
Now go to the created directory:
cd ~/tempWP
After that, you need to update the package lists to the current ones, with the command:
sudo apt-get update
If you don't have the curl utility, install it with the command:
sudo apt install curl
Download the WordPress archive with the command:
curl -O [https://wordpress.org/latest.tar.gz](https://wordpress.org/latest.tar.gz)
Unpack the archive and move the files from the current directory to the /var/www/html/ directory with the command:
sudo tar zxvf ~/tempWP/latest.tar.gz -C /var/www/html
Delete the tempWRC directory with the command:
rm -Rf ~/tempWP rm -Rf ~/tempWP
Setting up a MySQL database
To get started with WordPress, we need to create and set up a dedicated MySQL database. For this:
- Open a terminal window as root or sudo.
- To switch to the MySQL shell, type the following command:
sudo mysql -u root -p
Use root account authentication which is specific to MySQL
- Then create a new database for WordPress, type the following command:
CREATE DATABASE database_name;
For example:
CREATE DATABASE wordpress;
Pay attention to the following:
After all MySQL commands, there must be a semicolon at the end of the command.
- Next, create a user with full access rights to the created database and assign a password to him, use the command:
CREATE USER username@localhost IDENTIFIED BY 'password';
For example:
CREATE USER wuser@localhost IDENTIFIED BY 'mypassword';
- Now you need to give the new user the necessary privileges to create and modify database tables, for this we will use the command:
GRANT ALL PRIVILEGES ON basename.\* TO username@localhost;
For example:
GRANT ALL PRIVILEGES ON wordpress.\* TO wuser@localhost;
- Next, you need to grant actual privileges to the database tables with the command:
FLUSH PRIVILEGES;
- Exit the MySQL shell with the command:
exit
Customizing WordPress Configuration Files
Now you need to perform the initial setup of the WordPress configuration files:
- Here you need to go to the directory with the WordPress configuration files, type the command:
cd /var/www/html/wordpress
- Rename the wp-config-sample.php file to wp-config.php, for this we use the command:
mv
For example:
sudo mv wp-config-sample.php wp-config.php
- Next, open the wp-config.php file for editing, we will use the nano command:
sudo nano wp-config.php
-
- In the wp-config.php file, you should pay attention to the following lines:

- Then the wp-config.php file, we make the following changes:
- Replace the default values with the values you specified when configuring MySQL - see the section above:
For example:
define( 'DB_NAME', 'wordpresssite' ); define( 'DB_USER', 'wuseradminchik' ); define( 'DB_PASSWORD', 'mypassword12345pauli' );
- Save your changes using the keyboard shortcut CTRL+O.
- Finish editing using the keyboard shortcut CTRL+X.
- Next, we replace the owner of directories and files in the root directory of the web server with the command:
sudo chown -R username:www-data /var/www/html/wordpress/ where username is the username, www-data is the group name
For example:
sudo chown -R www-data:www-data /var/www/html/wordpress/
Note:
To avoid Apache web server errors when running scripts, use www-data username and www-data group name by default.
- If you need to grant access to the files of the web server root directory to another user, include him in the www-data group, use the command:
sudo usermod -a -G www-data username
For example:
sudo usermod -a -G www-data wuser
- Set file and folder permissions with the following command:
sudo chmod -R 755 /var/www
- For WordPress to work securely, we need unique keys. To do this, we perform:
curl -s https://api.wordpress.org/secret-key/1.1/salt/
After you will see the following information, it contains all the key values: see the image below

note
The key values above are given as an example. You need to use the key values that you got as a result of running the curl command.
- Open the wp-config.php file for editing by running:
nano wp-config.php
- In the wp-config.php file, find the section:
define('AUTH_KEY', 'put your unique phrase here'); define('SECURE_AUTH_KEY', 'put your unique phrase here'); define('LOGGED_IN_KEY', 'put your unique phrase here'); define('NONCE_KEY', 'put your unique phrase here'); define('AUTH_SALT', 'put your unique phrase here'); define('SECURE_AUTH_SALT', 'put your unique phrase here'); define('LOGGED_IN_SALT', 'put your unique phrase here'); define('NONCE_SALT', 'put your unique phrase here');
- In the appropriate lines, enter the unique key values obtained as a result of the curl command, pay attention to this example:
define('AUTH_KEY', 'modfjowifjweofjiwefjiweofnwinenfnefwfw4993ee'); define('SECURE_AUTH_KEY', 'pdmwpf9irrjienfwfmwofiw-fkw-mfwejfe-mpifok[fopfkeo-fj'); define('LOGGED_IN_KEY', 'poefhp0fnipfjq-fjqpfjfwpiefjqpdkod[kmlsmcijdjqmdmodkq[kd[']); define('NONCE_KEY', 'knlciohqoihjqppijcmpijdpdo;jdihihfouhnkxcmaspidlimddnqpij'); define('AUTH_SALT', 'oliospjqipcndic0popmpeqeoq[mqdoqdd695d9q5d5qd2q6w2q5wd21d'); define('SECURE_AUTH_SALT', 'mpqjqdiqjwdqwidhqwhqwpdjIJPJPJPjmpjPIJPIjpJPj754847JHu'); define('LOGGED_IN_SALT', '323rlj2irj23pirjn2rn2ondkjwpocksdp;jjKIJOIJiJIJll;.edd'); define('NONCE_SALT', 'piicjdiwqnolhoIIOhIHOIJIjijIJ;SCKODWDPMNVIC');
- Save your changes using the keyboard shortcut CTRL+O.
- Finish editing using the keyboard shortcut CTRL+X.
- Restart the Apache web server, run:
sudo systemctl restart apache2
WordPress installation process
To install WordPress:
- In the address bar of the browser, add the line to the external address of the web server:
/wordpress/wp-admin/install.php
- Select the system language and click the button Continue:
- On the settings page:
- Choose a WordPress site name and username.
- By default, a strong password will be generated. Use this password or enter a new one.
note
Using a weak password will reduce the security of the site, I recommend that you create a very strong and long password.
- Enter an email address.
- If necessary, mark the visibility points in search engines.
- Click the Install WordPress button: see image below

- Once Wordpress is installed, login:

File and folder permissions (chmod) WordpRess
Pay attention to the need to set permissions on files and folders in your WordPress structure. Correctly set permissions will prevent the problem associated with connecting via FTP. Incorrectly set permissions on folders/files can be one of the sources of problems with FTP, while WordPress cannot independently create and make the necessary changes to the site structure on the server.
Rights must be set according to the following scheme:
- folders 755, files 644 - when the WordPress admin, the same under which you connect via FTP and change files.
- folders 775, files 664 - when the WordPress admin is different from the user under which you connect via FTP and change files. Please note that this WordPress user must be in a group that has write access.
As an example, an extract from a WordPress security plugin:
Set read/write permissions for WordPress files and folders, allowing you to control access to those files. During the initial installation, WordPress automatically assigns reasonable permissions to its file system.
However, sometimes people or plugins change the permissions on certain directories and files, thus lowering the security level of their site by setting the wrong permissions.
Please pay attention to the image provided by the WP security plugin:

As you can see, the image clearly shows exactly which directories and files have incorrect access rights. They are marked in red, with a hint (what resolution should be set for them). Directories and files with correct permissions are marked in green.
You can do the necessary permissions on folders/files by running the following commands:
chmod 755 path_to_directory (example: web/your_site/public_html/wp-content/themes)
or
chmod 644 path_to_file (example: web/your_site/public_html/.htaccess)
Pay attention to the -R subscript when executing the command, it will overwrite the rights to all subdirectories in the directory path. Example:
chmod -R 755 path_to_directory (example: web/your_site/public_html/wp-content/themes)
The following command can also help you with this, go to the directory of your site by running the command:
cd /home/site/public_html find . -type f -exec chmod 644 {} + find . -type d -exec chmod 755 {} +
in case 775 and 664 are required
cd /home/site/www find . -type f -exec chmod 664 {} + find . -type d -exec chmod 775 {} +
note: directory path may be different, this is an example, your path may be different.
Problems Installing WordPress
Error 1: "error database connection' is a database connection error.
Solution:
1. Check the correctness of the specified name from the database, logs and password in the wp-config.php file;
2. Make sure the user has full permissions to access the WordPress database and modify tables;
Error 2: "Warning: define() expects at least 2 parameters» - the error should indicate the path example: \wp-config.php on line 26.
Solution:
1. Check wp-config.php line 26 (line 26) for non-closed tags (>) or no ( ; ) at the end of the constant;
2. Check the beginning of the file, it must start with <?php, до него ничего не должно быть: ни пробелов ни пустых строк;
Error 3: "fatal error: allowed memory size of 67114514 bytes exhausted” is an error that indicates a lack of memory in WordPress.
Solution:
1. The solution is very simple, you need to add a constant to increase the amount of RAM. To do this, open the wp-config.php file and add the following line inside the main php tag:
define( 'WP_MEMORY_LIMIT', '128M' );
note: the value can be increased from 128 to 512 (this is up to you, it all depends on the resources of your server).
Error 4: "Update and change request via FTP"- not a very pleasant error, it will pop up all the time, when updating WP, installing plugins and any changes on the site. One of the possible reasons is incorrect folder/file permissions.
Solution:
1. The most powerful solution is a constant that bypasses such prohibitions. To do this, open the wp-config.php file and add the following constant inside the main php tag:
/** Initialize WordPress variables and include files. */ require_once ABSPATH . 'wp-settings.php'; define('FS_METHOD', 'direct');
Error 5: "Warning: Cannot modify header information - headers already sent by (output started at / /www/WP/wp-config.php:1)» - the error is related to sending headers, wp tells us that the headers have already been sent to config.php: 1 from the first line. Reason: editing the config.php file with a simple notepad that saves the file in UTF-8 encoding with a signature.
Solution:
Solution: 1. The solution is very simple, open the wp-config.php file with another text editor like Notepad2 and save it in UTF-8 format.
Error 6: "Cannot create CNC after installation" is a redirect issue in WordpRess.
Solution:
1. The first solution is to create a .htaccess file in the root directory of the site with permissions 777. Here the WP script will add the necessary information to it.
2. If this does not happen, you can insert the following lines into the .htaccess file yourself (at the beginning of the file):
# BEGIN WordPress RewriteEngine On RewriteBase / RewriteCond %{REQUEST_FILENAME} !-f RewriteCond %{REQUEST_FILENAME} !-d RewriteRule . /index.php [L] # END WordPress
I have described the solution to the most common problems encountered during the installation of WordPress.
Where are the folders and files of a WordPress site
In this section, I decided to briefly describe the paths to files and folders. This information will come in handy when working on a WordPress site. So to say a reminder for you:
Where is the site's root directory?
The root directory of the site can be located in the following ways:
home/web/your_site/public_html; /web/your_site/public_html; /www/web/your_site/public_html; /www/your_site/public_html; /web/your_site/www; /your_site/www;
Once you have found the site's root directory, finding the rest of the folders/files is easy. Let's take the root directory "public_html”, as an example of course.
Where is the wp-config.php file located?
The wp-config.php file is located at the following path in the root directory:
/public_html/wp-config.php
note: if this file does not exist, then it can be called wp-config-sample.php (for correct operation, it must be renamed, this was described in all sections of the manual).
Where is the .htaccess file?
This file is also located in the root of the site in the following path:
/public_html/.htaccess
If it is not in the root of the site, then you can create it with any text editor (do not forget to put a dot at the beginning of the name of this file). It is extremely important for running a WordPress site on an Apache+PHP server.
Where is the wp-login.php file located?
This is the file responsible for logging in to the WordPress admin panel (by default, if not otherwise). It is located:
/public_html/wp-login.php
Where is the index.php file located?
This file can be found in the following path:
/public_html/index.php
Where is the wp-includes folder located?
This folder contains all WP resources, you can find it in the following path:
/public_html/wp-includes/
Where is the wp-admin folder located?
This folder is also the first one in the directory, follow the path:
/public_html/wp-admin/
Where can I find the wp-content folder?
This folder contains everything related to the content of your site, plugins, themes and more. Follow the path:
/public_html/wp-content/
How to find the WordPress theme folder?
Easy, this folder contains all the files of your theme (downloaded themes), located in the subdirectory:
/public_html/wp-content/themes/
How to find the plugins folder in WordPress?
This folder is located in the same place as the theme folder. It contains all installed or downloaded WP plugin files. Look for it in this path:
/public_html/wp-content/plugins/
Where is the header.php file located?
This file is very important and is located in the directory of the theme you installed, it is responsible for displaying the main information of the site header (site head), advertising codes can be written in it, scripts and styles can be connected, as well as site meta data, follow the path:
/public_html/wp-content/themes/your_theme/header.php
Where is the footer.php file located?
Located in the same folder of the installed theme, it is responsible for displaying information at the very bottom of the site. There you can place links, logo, copyright to site information, menus, and more:
/public_html/wp-content/themes/your_theme/footer.php
Where is the instructions file functions.php?
Without this file, your theme simply will not function, and the site will give a 500 error. It contains the main features of the theme, modify it very carefully (create a backup copy):
/public_html/wp-content/themes/your_theme/functions.php
How to find the content.php of an installed WordPress theme?
From the name it is clear that the file is responsible for displaying content on the site, it is located here:
/public_html/wp-content/themes/your_theme/content.php
How to find 404.php in a WordPress theme?
Finding the 404 php file is not difficult, it is responsible for displaying the 404 error page (content not found) in the topic:
/public_html/wp-content/themes/your_theme/404.php
Where to find page.php in a WP theme?
This PHP file is responsible for displaying pages (static) on your site, located here:
/public_html/wp-content/themes/your_theme/page.php
Where is the comments.php file located?
Responsible for displaying comments on your site, located in the following path:
/public_html/wp-content/themes/your_theme/comments.php
Where can I find the style.css file in the installed WordPress theme?
The theme style file, by default, is located in the theme folder, you can make changes to the site style in it, provided that there is no other style.css file created. You can find it in the following path:
/public_html/wp-content/themes/your_theme/style.css
I tried to describe to you all the folders / files that you may have to work with. This is the bare minimum, because when you install the theme, plugins, and upload images to the site, the directory structure of the site will change a lot. These are the main paths that will be valid at all times.
Conclusion
Guys, honestly, I already published an article on the topic of installing WordPress before the breakdown and abandonment of my site. This article was very difficult for me to write. I tried to convey as much information as possible in this guide so that you don’t steam around looking for various pieces of information. And could get acquainted with all the details from one place. Here is everything you need for the initial installation of WordPress.
I will be very happy if you write a good comment on this guide and share it on social networks. In the next guide, I will tell you how to log into WordPress and what its admin panel looks like. Please note that there will be a whole series of articles about WordPress, such as installing a theme on a site. They will guide you step-by-step through everything to a fully functional WP site. I sincerely wish you good luck in creating your sites.
Reading this article:
- Installing Themes in WordPress - How to Install a Theme in WordPress
- Creating Pages in WordPress - A Detailed Guide
Thanks for reading: SEO HELPER | NICOLA.TOP


Installation in 5 minutes, and the article for all 35 minutes. A huge guide, it doesn’t seem to me, or have you really painted almost all the ways to install WordPress? Bombically, I will be your reader.
Good afternoon, Eugene, I'm very happy, I tried)))
In general, you have a cool site, top management. Too bad it's not in the top five. Excellent material. I was able to install Wordpress on the server thanks to your instructions. Thanks again.
May I just say what a comfort to discover a person that truly understands
what they're talking about on the web. You actually know how to
bring an issue to light and make it important. More people must read this and understand this
side of the story. I was surprised that you aren't more popular since you certainly possess the gift.