Step by Step: Creating and Setting Up a WordPress Blog
![]()
 WordPress is one of the most popular platforms for creating blogs and websites. It's easy to use, flexible and powerful, and allows creators to express themselves and their ideas online. In this article, we will look at each a step in the process of creating and setting up a WordPress blogso you can start your path to success in the blogosphere.
The content of the article:
- How to choose the right hosting and domain for your blog
- Hosting selection criteria
- Where to buy a domain
- Installing WordPress on Hosting
- Step-1: Download and Install WordPress
- Step-2: Database setup
- Step-3: Setting Up the Configuration File
- Choosing and Installing a Blog Theme
- Setting up blog plugins
- Review of the Best WordPress Blog Plugins
- Installing and configuring plugins for SEO, analytics, contact forms and other features
- Adding content to the blog
- Create your first post
- Adding Images and Media to Posts
- Setting categories and tags (tags) for posts
- Setting up permalinks
- Customizing the appearance and interface of the blog
- Widget settings (widgets in the sidebar and footer)
- Adding a navigation menu
- Customizing the display of comments
- Blog Promotion
- Blog advertising through social networks
- Blog promotion through SEO optimization
- Conclusion
- FAQ
How to choose the right hosting and domain for your blog
- When choosing hosting for your blog, it's important to consider your needs and budget. If you plan to use a blog for business, then it is recommended to choose a hosting with high reliability and speed. If you plan to use the blog only for personal purposes, you can choose a cheaper hosting.
- When choosing a domain name, you should keep in mind that it should be short, easy to remember, and reflect the essence of your blog. Also, it is important to check that the domain name is not taken by other websites.
- After choosing a domain name and hosting, you can move on to installing and configuring WordPress. This is a process that can take some time, but after you go through it, you will be able to start working on your project.
Hosting selection criteria
 When you choose hosting for your blog, it is important to consider a number of criteria such as loading speed, reliability, support, price, and functionality.
Reliable hosting ensures uninterrupted site operation and minimal security issues. A fast loading speed enhances the user experience and helps your site rank higher in the search engines.
You should also check if the hosting supports WordPress and if it has enough resources for your site. Some hosts also offer automatic WordPress installations, which can make the setup process easier.
- Speed and reliabilityA: One of the most important criteria when choosing a hosting is the speed and reliability of the server. This means that your blog must load quickly and not be interrupted in order to keep visitors on the site.
- Support and DocumentationA: A host that provides high quality support and affordable documentation is an important consideration when choosing a host. This means that if you run into a problem, you can easily get help and you can set up and optimize your blog yourself.
Where to buy a domain

- First, decide on the type of domain you need. If you are creating a personal blog, then .me or .blog would be ideal. If you are creating a blog for your business, then .com is the best choice.
- The next step is to go to domain registrar sites like GoDaddy, Namecheap, 1&1 etc. Here you can check the availability of the domain you need and purchase it.
- If you cannot find a suitable domain, you can use the search for alternatives. Some sites, such as Domainr, allow you to find other domain options that may be suitable for your blog.
Learn more about registering and getting a domain in this article: Register a domain or how to get a domain for a website.
Installing WordPress on Hosting
If you have chosen hosting and bought a domain, now you need to install WordPress on the hosting. Installing WordPress is quite simple and can be completed in a few minutes. Here is how you can do it:
- Log in to your hosting account and go to the installation management section. You should find the option "install wordpress” or “install scripts”.
- Select installation options. Enter your blog name, admin name, email address, and other required information.
- Wait for the installation to complete. Once the installation is complete, you will receive a notification and a password to access the admin panel.

Now that WordPress is installed on your hosting, you can start setting up your blog.
Step-1: Download and Install WordPress
- Go to the WordPress.org website and click the “Download WordPress“.
- Unzip the archive and upload all the files to your hosting using an FTP client.

- Open your browser and navigate to the URL where WordPress is installed. The installation process will begin.
- Select a language and click the "Continue" button.
- Specify data for connecting to the database: username, password and database name.
- Click the "Submit" button.
- Installation completed. Specify the data for logging into the administrative panel and click the “Log In” button.

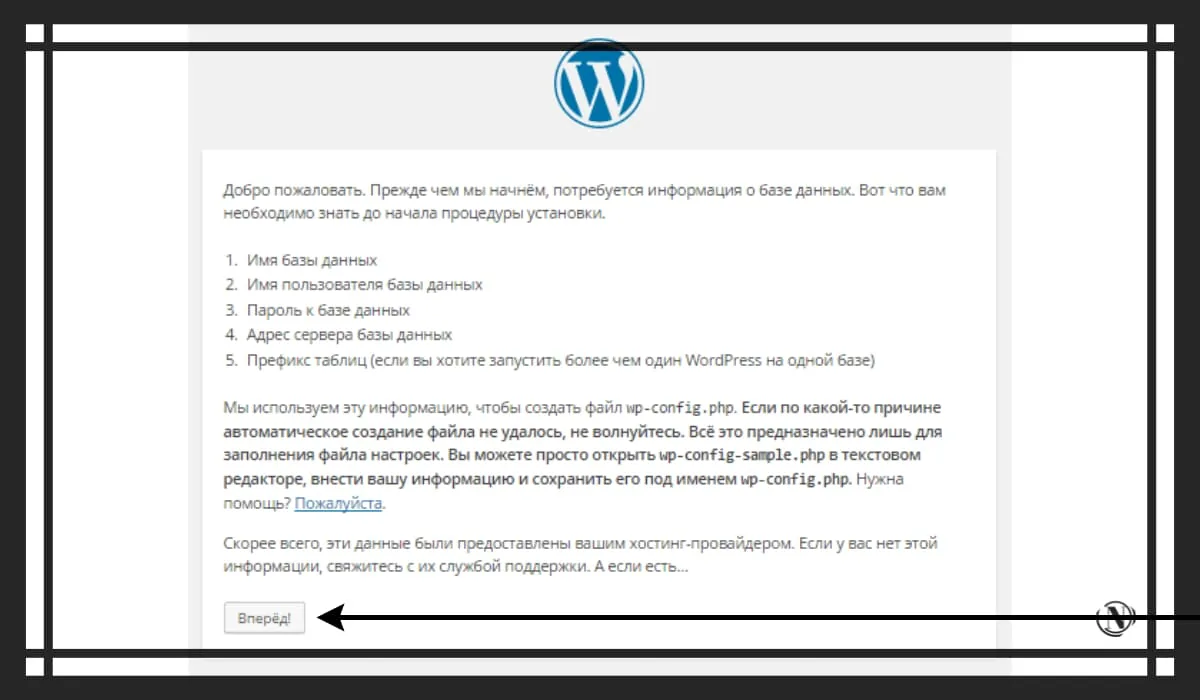


Step-2: Database setup
- In your hosting control panel, create a new database for your blog.
- Make a note of the database name, username, and password for later use.
- Open the wp-config-sample.php file in the root folder of your WordPress installation and change the following values:
- Provide a database name, username, and password so that WordPress can connect to it.
- Save your changes and rename the file to wp-config.php.
- Provide a database name, username, and password so that WordPress can connect to it.


Step-3: Setting Up the Configuration File
- Open the wp-config.php file in the root folder of your WordPress installation.
- Specify a prefix table name to avoid conflicts with other tables in the database.
- Install security keys to increase the security of your WordPress installation.


Choosing and Installing a Blog Theme
- How to choose the right theme
Choosing a theme for your blog is an important step as it determines the look and feel of your site. When choosing a theme, you should consider the following criteria: WordPress compatibility, design, responsiveness, loading speed, additional features, and developer support.
- Installing a Theme Through the WordPress Dashboard
Installing a theme in WordPress is a fairly simple procedure. Go to the "Appearance" section in your WordPress dashboard and select the option "Themes". Then click the "Add new» and select a theme from the catalog. After downloading the theme, click the "Activate".
The following guide: Installing Themes in WordPress - How to Install a Theme in WordPress details the process of installing WordPress themes.
- Theme customization: change the logo, colors and other settings
Theme customization in WordPress is a process that allows you to change the look and feel of a website and customize it to suit your needs. Changing the logo, colors, and other settings is one of the most important elements of theme customization.
You can change the logo by uploading an image from your computer to your WordPress dashboard. You can also change the color scheme by selecting the appropriate color in the theme settings. Some themes may require you to manually make changes to the theme code, so before you start customizing, make sure you have sufficient knowledge and skills in this area.
Setting up blog plugins
Setting up plugins is an important step in creating and running your WordPress blog. Plugins add advanced functionality and enhance your blog experience. Some of the popular plugins include SEO, caching, analytics, and more.
very simple and takes only a few minutes. You can search for and install plugins through your WordPress dashboard or upload them via FTP. However, before installing a new plugin, make sure it is compatible with your version of WordPress and read reviews from other users.

Review of the Best WordPress Blog Plugins
One of the best WordPress SEO plugins is Yoast SEO. This plugin gives you all the tools you need to optimize your posts and pages for search engines. It analyzes your content and makes recommendations to improve it, and it also allows you to customize titles, meta descriptions, and keywords.
Another popular plugin is Jetpack. This plugin offers many features including analytics, spam protection, image optimization, and more. It also allows you to connect to social networks and automatically publish your posts to your accounts. This plugin is very useful for those who want to simplify and speed up their WordPress blog.
Another useful plugin, Contact Form 7, allows you to create contact forms for your website. This is the perfect way for your visitors to contact you and send you a message. You can also set up emails that will be sent to you when someone submits a form.
Installing and configuring plugins for SEO, analytics, contact forms and other features
Step-1: Installing the SEO Plugin:
a. Log in to your WordPress dashboard.
b. Go to the Plugins page and click Add New.
c. Enter “SEO plugin” in the search bar and click on “Search Plugins”.
d. Select the plugin you want to install and click "Install".
e. After installation, click "Activate".
Step 1.2: SEO Plugin Setup:
a. Go to the "Settings" page and select "SEO".
b. Customize the plugin to your liking by entering keywords, meta description and other information.
c. Save your changes.
Step-2: Installing the analytics plugin:
- In your WordPress dashboard, go to the Plugins section
- Click the "Add New" button
- Search for the plugin you want to install (e.g. “Google Analytics for WordPress” for analytics)
- Click the "Install" button
- After successful installation, activate the plugin
Step 2.2: Setting up the analytics plugin:
- In your WordPress dashboard, go to the Plugins section
- Find and click on the plugin you have installed
- Customize the plugin according to your needs (for example, add a Google Analytics ID for analytics)
- Save your changes and check the setup results.
Step-3: Installing and configuring the contact form:
- Log in to your WordPress dashboard.
- From the left menu select "Plugins" and then "Add New".
- Search for a contact form plugin, such as Contact Form 7 or Gravity Forms.
- Click the "Install" button for the selected plugin.
- After successful installation, activate the plugin.
- In the left menu, go to the “Forms” section or a similar section, create a new form.
- Customize the form, add fields, set the email address for receiving messages and other necessary settings.
- Add a form to a website page using a widget, shortcode, or other methods provided by your plugin.
Important: To successfully install and configure the contact form plugin, you may need to gain additional knowledge and skills.
Adding content to the blog
Adding content is one of the most important parts of creating and managing your blog. To make your blog interesting and useful for your readers, you need to constantly add new content. This can be in the form of articles, images, videos, audio, or any other media that your audience might find useful.
Create your first post
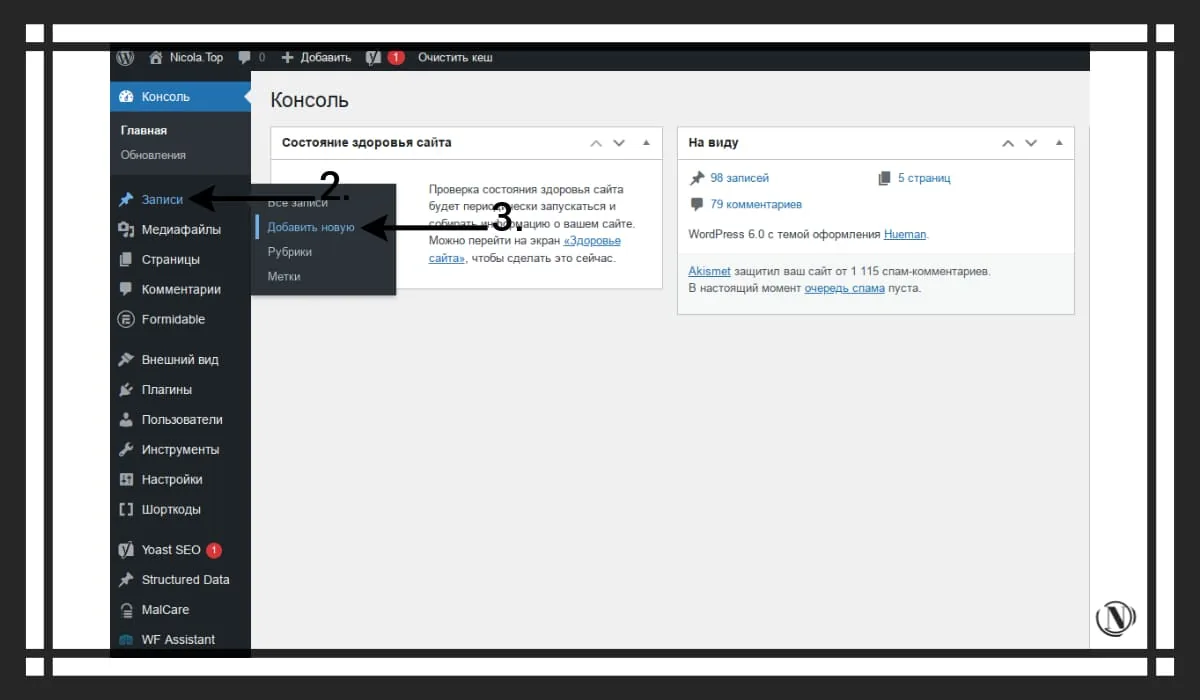
In order to create the first post on your blog, you need to follow these instructions:
- Log in to your WordPress dashboard.
- Click on the “Posts” button in the menu on the left and select “Add new“.
- Enter a title for your post in the “header“.
- Add the post text in the content editor. You can add text, images, videos and other media elements.
- Customize the category and tags for your post to make it easier for users to find.
- Click the "Publish" button to publish your post on your blog.


Your first post is now viewable on your blog! Don't forget to keep adding new content to keep your blog active.
Adding Images and Media to Posts
Adding images and media files to WordPress posts is pretty easy. The following steps will help you do this:
- Log in to your WordPress dashboard.
- Open an existing post or create a new one.
- Click on the “Add media files” in the top menu of the editor.
- Select the image or media file you want to add from your computer.
- Press the buttondownload files“.
- Once the file is uploaded, you can add it to your post using an image or media file embed.
- Don't forget to save your post after adding images or media files.


Setting categories and tags (tags) for posts
To set categories and tags in your WordPress posts, you can follow these simple steps:
- Log out to your WordPress dashboard and select posts or posts.
- Click on edit the post you want to add categories or tags.
- Find the section “Categories” or “Tags” in the post edit sidebar and select an existing category or create a new one.
- To create a new category or tag, you can click on “New category" or "New label” and enter the name of the new category or tag.
- Once you've selected categories and tags, click the "Publish" or "Refresh“ to save the changes.
- Repeat this process for each post you want to add to the category.


Setting up permalinks
- Log in to the WordPress admin panel.
- Go to the section "Settings” and select “Permalinks“.
- Choose your preferred permalink format. You can choose between “default” format, which uses numeric post IDs, or “post title”, which uses the post title as part of the URL.
- Press the buttonSave Changes“ to apply your settings.
- Check that your permalinks are working correctly by going through multiple posts and checking that each post's URL looks like what you expect.


Customizing the appearance and interface of the blog
Quality customization of the appearance and interface of your blog is an important step in its creation. This allows you to define the look and feel of the site and its user interface so that it looks professional and attractive to your visitors. Regardless of the choice, careful customization is required to make your blog look the way you want it to.
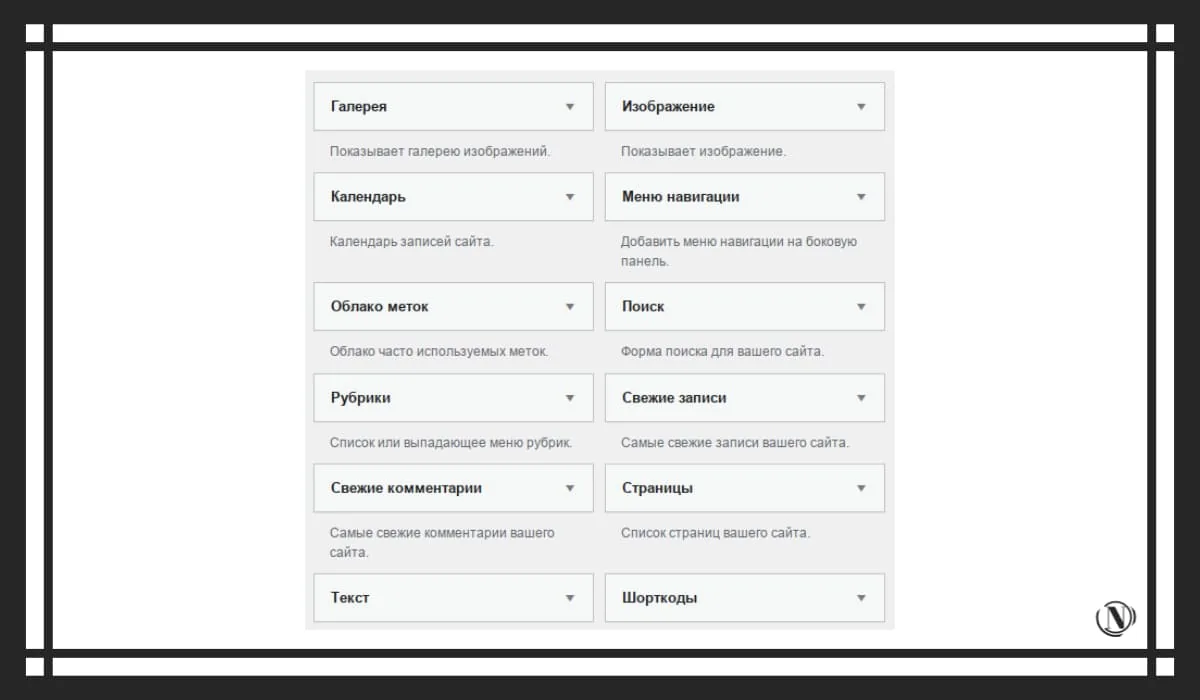
Widget settings (widgets in the sidebar and footer)
- Log in to the WordPress admin panel.
- Go to the "Appearance" section and select "Widgets“.
- Select the sidebar or footer where you want to add the widget.
- Click on the “Add Widget“.
- Select the desired widget from the list of available widgets.
- Fill in the required information fields in the widget.
- Press the buttonSave“.
- Repeat steps 4-7 to add more widgets.
- Don't forget to review your blog to make sure the widgets are displayed correctly.


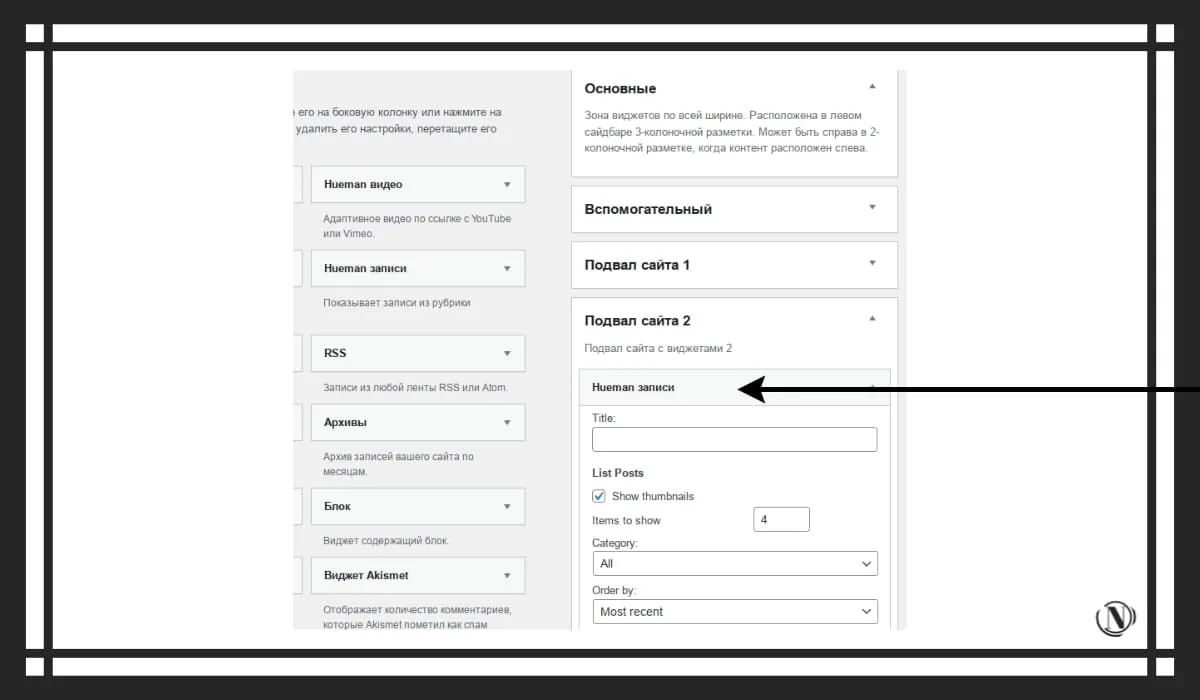
Please note that some WordPress themes may have their own widgets and customization options. In such cases, you can follow the theme's instructions to customize the widgets.
Adding a navigation menu
- Admin Login: Open your web browser and login to your blog's admin panel.
- Go to “Appearance”: Find the menu “Appearance” and click on it.
- Select “Menu”: From the list, select “Menu“.
- Menu Creation: Press the “Create menu” and give your menu a name.
- Adding menu items: Use the menu “Add item” to add menu items. You can add links to your posts, pages, and other web resources.
- Menu Location: Select the location where you want to display the menu using the “Menu Location“.
- Saving changes: Press the button “save menu” to save the changes.
- View result: Open yours and check the result of the work done.


Customizing the display of comments
- Login to your blog's dashboard.
- Find the tab "Settings” and click on “Discussion“.
- Here you can choose how you want your comments to be displayed. For example, you can choose to approve comments before posting them, disable comments for specific posts, or add an anti-spam filter.
- When you're done customizing, don't forget to save your changes.


It's important to ensure that your comments look pleasing to your visitors and help build an active community around your blog.
Blog Promotion
- Prepare your blog for promotion: In order to improve the visibility of your blog, you must follow some rules. Make sure your blog has the right structure, beautiful design, and user-friendly interface. Post quality content regularly.
- Use different ways to promote: There are many ways to help you promote your blog. You can use social media, advertising, partnerships with other websites and blogs, SEO optimization, email marketing, and other techniques. Choose the most effective methods for your audience and goals.
Blog advertising through social networks
To advertise your blog through social networks, follow these instructions:
- Register on popular social networks such as Facebook, Twitter, Instagram or LinkedIn.
- Create a profile for your blog or website and promote it.
- Post related to your blog and include a link to your blog in every post.
- Develop creative and interesting posts to grab the attention of users.
- Work on improving your profile by adding information about your blog and your services.
- Advertise your blog through social media advertising campaigns such as Facebook Ads or Twitter Ads.
- Track success rates and continue to implement changes to your advertising strategy.
Blog promotion through SEO optimization
SEO guide for your blog:
- Research keywordsA: Start by researching the keywords that best describe your blog and your posts. Use keyword analysis tools like Google Keyword Planner to identify effective keywords for your audience.
- Optimize your title and meta description: Use your keywords in the title and meta description of your posts to help search engines understand your content better.
- Use your keywords in the text: Use your keywords in the text of your posts, but don't forget about naturalness. Incorrect optimization can lead to punishment by search engines.
conclusions
In this guide, we have provided a step by step plan for creating and setting up a WordPress blog. From choosing the right domain name and hosting to adding a navigation menu and customizing the display of comments, we've followed every step.
We also looked at best practices and best practices for successfully setting up and promoting your blog, such as using effective SEO techniques and social media advertising. By following these guidelines, you will be able to increase the visibility of your blog and attract more readers.
FAQ
Q: Why do I need hosting and a domain for a blog?
Hosting and a domain are necessary for your blog to be available on the Internet and users to access it.
Q: How to choose the right hosting?
The choice of hosting depends on many factors such as performance requirements, the size of your blog, etc. You need to choose a reliable provider that has WordPress support.
Q: How to choose the right domain?
The domain should be easy to remember and reflect the theme of your blog. It is also important to choose a domain with the correct extension that matches your country or target audience.
Q: Why do I need to install WordPress?
A: WordPress is a platform for creating blogs and websites. Installing WordPress is required in order to start creating your blog.
Q: How to install WordPress on hosting?
Installing WordPress on hosting depends on the hosting provider, but usually the installation process consists of uploading files to the server and running the installer.
Q: What settings do I need to do after installing WordPress?
A: Once WordPress is installed, there are some basic settings that need to be done, such as setting the language, choosing a theme, and installing plugins.
Q: Why choose a topic for a blog?
A: A theme is the design of your blog that will be displayed to your users. Choosing a theme is important to making your blog user-friendly and engaging.
Q: How to choose the right topic for a blog?
A: When choosing a theme, you need to consider factors such as functionality, design, and compatibility with your plugins.
Q: How to install a theme on a blog?
The theme can be installed through the WordPress admin panel. You need to find a suitable theme in the theme library and install it.
Q: What are plugins in WordPress?
A: Plugins are programs that add extra functionality to your blog. There are many plugins in WordPress that help improve website performance, optimize it for search engines, and more.
Q: How to choose the right blog plugins?
Factors to consider when choosing plugins include functionality, compatibility with your version of WordPress, etc.
Q: How to install plugins on a blog?
A: Plugins can be installed through the WordPress admin panel. You need to find the appropriate plugin in the plugin library and install it.
Q: What settings need to be done after installing plugins?
After installing the plugins, you need to make settings that depend on the specific plugin. Some plugins may have settings that allow you to improve site performance or customize the look and feel of your site.
Q: Why add content to a blog?
Content is the foundation of your blog, which attracts users and improves its position in search engines. Without content, your blog will be uninteresting and have no visitors.
Q: How to add content to the blog?
A: Content can be added through the WordPress admin panel. You need to create a new post or page and add text, images, videos, etc. to it.
Q: What is the best content to add to a blog?
It is best to add content that will be useful and interesting to your visitors. Content should be unique, informative, and focused on your blog topic.
Why do I need to customize the appearance and interface of the blog?
The look and feel is what first grabs the attention of users and gives the impression of your blog. Customizing the appearance and interface helps make your blog more attractive and user-friendly.
Q: How do I customize the look and feel of a WordPress blog?
In WordPress, you can customize the look and feel of your blog using themes and plugins. By choosing the right theme, you can change the design of your blog, and with the help of plugins, you can add additional functionality and improve the interface.
Q: How to set up widgets on the site?
Widgets are blocks that can be placed on the sidebar, footer, or other parts of your site. To configure widgets, you need to go to the "Widgets" section in the WordPress admin panel and select the widgets you want to place on the site.
Q: What interface elements can be customized in WordPress?
In WordPress, you can customize interface elements such as menus, fonts, colors, titles, buttons, and more. They can be customized to suit the theme and purpose of your blog.
Q: What is blog promotion and why is it needed?
Blog promotion is a set of activities aimed at attracting new visitors to the site and increasing its popularity. Blog promotion helps to improve its position in search engines and increase conversion.
Q: What methods of blog promotion are there?
A: There are many blog promotion methods such as SEO, contextual advertising, social media, email marketing, etc.
Q: How to increase the position of the blog in search engines?
A: In order to increase the position of a blog in search engines, it is necessary to perform SEO optimization. You need to optimize the content, improve the internal structure of the site, get high-quality external links, etc.
Reading this article:
Thanks for reading: SEO HELPER | NICOLA.TOP