How to protect WordPress files and directories with .htaccess?
![]()
 The .htaccess file is a server configuration filesupported by many web servers, including the most popular Apache web server software. This seemingly unassuming file is filled with all sorts of functions that, when used correctly, can very effectively determine how your web server handles requests. Learn how to restrict access to WordPress files and directories with an .htaccess file.
In addition to determining how the web server processes requests, it is also very useful to protect your WordPress files from unauthorized access by hackers. In this article, I will look at many ways to secure WordPress files and directories with .htaccess.
The content of the article:
- How to protect WordPress files and directories with .htaccess?
- 1.1 Protecting the .htaccess file
- 1.2 Restrict access to wp-admin folder with .htaccess
- 1.3 Block unauthorized access to wp-config.php
- 1.4 How to block access to wp content/downloads and disable pHp execution?
- 1.5 Disable Directory Browsing in WordPress
- Blocking specific IP addresses from accessing the site
- 1.7 Blocking certain domains from accessing your website
- 2. Alternative solution
How to protect WordPress files and directories with .htaccess?
Let's take a look at some simple methods you can use to keep your WordPress files safe from prying eyes.
Before I move on to protecting other files, let's start with protecting .htaccess. However, as I always say, before making any changes (no matter how big or small) always make a backup copy of your site and in this case keep a couple of copies of your .htaccess file on your local system. This should prevent any damage that may result from accidental tampering with the file.
1.1 Protecting the .htaccess file
The .htaccess file can be easily found in the root web folder public_html. There are two ways to access this file - using FTP like FileZilla or using the file manager of your WordPress hosting account. In this article, I use a file manager to access a file and show you how you can protect it.
Step 1: Log in to your web hosting account using your username and password. If you are unsure of your web hosting account credentials, contact your hosting provider for assistance.
Step 2: Click "File manager".

Select File Manager.
Step 3: Then click the public_html folder.
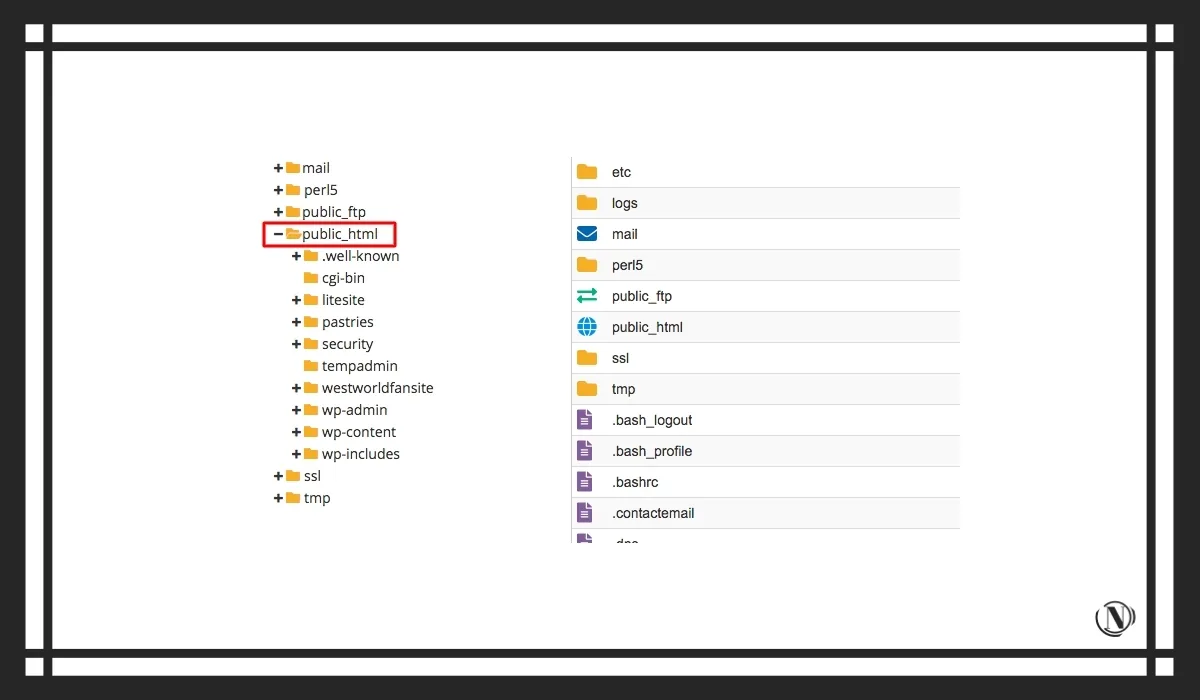
Select "public_html".
Step 4: Inside you will see a .htaccess file. Right click it. And choose an option editing.
Once you have access to the file, place the following code snippet in it.
# Deny access to .htaccess Order allow,deny Deny from all
This will restrict user access to your .htaccess file. Simple, right?
Now that we've secured the .htaccess file, it's time to move on to the rest. So let's start by securing the wp-admin folder.
1.2 Restrict access to wp-admin folder with .htaccess
The wp-admin folder contains the files that together make the administration tools work. The admin.php file in this folder performs the following functions:
- Allows you to connect to the database.
- Displays the WordPress toolbar.
- Manage the site login page.
As you can see, the wp-admin directory is very important, and care must be taken to protect it from unauthorized access. This is because access to the admin panel will allow a hacker to wreak havoc on your site. To do this, restrict users' access to the WordPress admin folder using the .htaccess file. Allow access to specific IP addresses of your choice. To do this, you will need to create a separate .htaccess file with some code (the one in the blue box below) and upload it to the wp-admin folder.
To create a new .htaccess file, simply open the new file in your default text editor and name it .htaccess. Not .htaccess.txt or .htaccess.doc or any other additional file extensions. Just .htaccess. Once you've done that, paste the following code into it.
# Limit logins and admin by IP order deny,allow deny from all allow from 12.34.56.78
To upload the newly created .htaccess file to the wp-admin folder, log into your web hosting account and open the file manager as shown below.

Select File Manager.
Once you click File Manager, you will see all the files and folders on your site as shown below. Then click on the public_html folder.

Select "public_html".
Click on the wp-admin folder.

Select "wp-admin".
Then click the download button as shown above.

Select Download.
Select the .htaccess you just created on your local system and upload it in the window that opens.

Download the file.
Once you've uploaded your new .htaccess file, you're done! These new security measures will restrict users from accessing your admin panel other than those you have explicitly given permission to.
Please note that this will only restrict access to wp-admin and will not restrict access to the WordPress site completely. Registered users can still access wp-admin, but this can also be limited by user roles. You can restrict permissions for users so that not every registered user can access the folder.
1.3 Block unauthorized access to wp-config.php
The wp-config file handles basic WordPress configurations and keeps sensitive information about your WordPress installation such as MySQL settings, secret keys, WordPress database connection details, etc. from prying eyes.
The .htaccess file can come in handy to protect this very important file accessed by a web user. To do this, all you have to do is copy the code below into your .htaccess file.
As described in the Securing the .htaccess file section, open the .htaccess file from the file manager and add the following code to it.
order allow,deny deny from all
Once you add the code above, you will block unauthorized access to wp-config.php.
1.4 How to block access to wp content/downloads and disable pHp execution?
to access files on your site so that even if a hack is discovered and fixed, they can easily access the site in the future. These backdoor files are often disguised as WordPress files in the wp-includes or wp-content/uploads/ directories. And these are often .php files. To better protect your WordPress files and folders, you need to disable the execution of such files. This can help with restricting WordPress access, and this can be done by disabling PHP execution in these directories.
Disabling PHP execution with .htaccess is a very simple process if you follow these simple instructions in the file.
First of all, create a new .htaccess file in a text editor and add the following code to it.
deny from all
As a next step, login to your web hosting account and open file Manager. This is where you access the content and download folder. Find a folder wp-content/upload/.

Select "downloads" from "wp-content".
Click the buttonDownload' and upload the .htaccess file you just created.

Select Download.
By pressing the button "Download» A new window will open where you can select an .htaccess file from your local system.

Upload file.
After you have uploaded the .htaccess file to the folder wp-content/upload/, you must add it to the folder wp-includes.
Same as adding to folder wp-content/upload/, open the file manager to access the folder wp-includes from your site's home directory.

Select "wp-includes".
Click a folder wp-includes, and then click the download button.

Select Download.
After you click the download button, you will be able to select a file from your local system. Select the .htaccess file you just created and upload it.

Download your file.
Once you've added .htaccess to both of these very important folders, you've successfully disabled any PHP execution in those folders.
Disable Directory Browsing in WordPress with htaccess
Directory browsing is a feature where you see a list of files and folders instead of a web page when you try to access a website. For example, you have a directory named private (as an example) on your website, let's say www.example.com. If directory browsing has not been disabled in that particular directory, then if someone types www.example.com/private/, it will see all files and folders in private directory.
This can be disastrous for your site because a hacker can get a huge amount of information. Who can then proceed to plan an attack on your site, armed with knowledge of your site's file hierarchy? By disabling directory browsing in WordPress with htaccess, you will limit the level of access to your site.
To disable directory browsing for a specific directory, create an .htaccess file in a text editor and save it as .htaccess (without any additional file extensions). Then add the following code to it and restrict access to your WordPress files.
# disable directory browsing Options All -Indexes
After adding the code, upload this newly created .htaccess file to the directory you want to disable this feature for. For example, if you want to disable directory browsing for the wp-includes folder, upload this .htaccess file to the wp-includes folder as you did earlier through the file manager.
Blocking specific IP addresses from accessing the site
You may have noticed that some users from certain IP addresses have repeatedly spammed, attempted to hack, or simply tried to gain unauthorized access to your WordPress site. You can completely prevent unauthorized access by a WordPress user by blocking their IP address from accessing your site using the .htaccess file. To do this, copy the code below into your .htaccess file.
order allow,deny deny from 128.476.75.1 allow from all
The IP address given in the code above is just a dummy. You can replace these values with the IP address you want to block. If you have multiple instead of one, just add each individually to a line that looks like this:
deny from 213.546.87.9
If, instead of the full IP address, you want to deny access to a block of IP addresses, simply omit the last octet as shown below.
deny from 213.546.87.9
This will block all IP addresses from 213.546.87.0 to 213.546.87.255.
1.7 Blocking certain domains from accessing your website
You may not always know the specific IP addresses that are spamming you. However, you may be aware that these attacks come from links hosted on certain malicious domains. .htaccess allows you to block any visitor who came to your site through a link from such malicious sites.
To block a domain name, add the following code to your .htaccess file.
SetEnvIfNoCase Referer "badsite.com" bad_referer Order Allow,Deny Allow from ALL Deny from env=bad_referer
In the code above, replace "bad site" with the domain you want to block. However, whenever a user tries to access your site from a domain that you have blocked, they will receive an error message and will not be able to access your site.
2. Alternative solution
While all of the solutions above are effective in restricting access to files and directories in WordPress, it cannot be denied that they pose a big risk to your site. Why? Well, because you are messing with a very important configuration file. Even an inappropriate dot can break the functionality of your site! Scary, right?
Therefore, if you are not an expert, it is best to use a WordPress website security plugin as it will help secure your site. WordPress plugins called Wordfence, All In One WP Security and MalCare can take care of the security aspects of your site. Whether it's blacklisting specific IP addresses, implementing website hardening measures, protecting your login page, scanning for malware, or many other essential security measures, these security plugins do it all!
Reading this article:
Thanks for reading: SEO HELPER | NICOLA.TOP